
Introduction
Adding a Fat Shark VR to your FPV collection might be the most valuable improvement you ever make. You must be eager to experiment with your virtual reality device. It’s obvious that you don’t want it to lose its position of authority.
How to charge Fatshark battery?
You’ll need a balancing charger to charge the FatShark battery at home. Fat shark batteries tend to suffer from balance charging errors. Before charging a FatShark battery, you must disable balance charging on the charger. Ensure the disability balance charging on the charger. Otherwise, you’ll find troubleshooting while charging the Fatshark battery.
So, you’re still unsure how to recharge that battery, are you? It’s not worth your time. Our step-by-step instructions are right here for your convenience! Here we go, shall we?
Tools Required for FatShark Battery Charging?
First, let’s go through the tools that you’ll be working with to recharge a FatShark battery. You’ll need to pick up a few more tools if you haven’t already.
You’ll need a battery charger to get started. You may also need additional power cables and extensions when purchasing a balancing charger.
Lipo batteries may be charged without the need for a charger. A balanced charger is a method of choice here, rather than the standard charger. Here are several balancing chargers we suggest for lipo batteries in this regard.
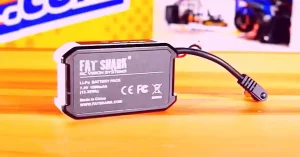
A charging cable is provided with each set of FatShark batteries for convenient charging on the go. One end features two male bullet connections, while the other end has a port
A parallel charging board may be added as an option. Balance charging isn’t necessary unless you’ve altered your battery to do so.
The Three Steps to Charging a FatShark Battery
The hard part is over now that you’ve determined what you’ll be utilizing. In light of this, let’s examine the process of recharging the battery.
These steps may be used with batteries that haven’t been swapped for balanced charging. As a last precaution, make sure your battery is in working.
These steps may be used with batteries that haven’t been swapped for balanced charging.
Lipo batteries cannot be charged using this method.
Step 1
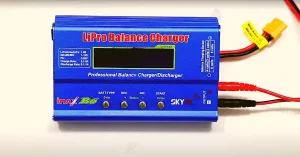
To begin, connect the balance charger to your computer or laptop. Turn on the charger’s balancing mode. ” ‘SYSTEM SETTING’ may be accessed from the main ‘BATT/PROGRAM’ menu.
Then, look for “Bal. Connection” in the menu. Because it’s generally on, you’ll have to unplug it. Enter the main menu after disabling “Balance Charging.”
Go to ‘LiPo BATT’ to find out how to do this. Set it to 1.0 A and 7.4 V. (2S). Check out the details if you see lip battery troubleshooting.
Step 2: Connecting the Battery to the Charger
Connect the Battery to the Charger in this step. Connect your balancing charger’s two male bullet connectors. This should be added to the ports on each end of the cable. Sort them into groups based on color. Keep them apart at all times.
Afterward, place the battery’s connection into the cable’s other port. Your balance charger should now be connected to your battery.
Step 3: Press the Balancing Cord
Use the FatShark Battery and charge it up. Press ‘Enter’ twice on your charger once you connect your FatShark battery to the balancing cord. Your battery will be charged instantly since the charger was already configured.
Errors with balance charge may usually be resolved by carefully following the on-screen directions. No problems with battery connections will be resolved by following these methods.
Charging your Fat Shark battery can take time if it is entirely discharged. The battery should ultimately be charged in about an hour.
It may take up to an hour and twenty minutes. [END: FINISH] will appear on the charger’s screen after charging is complete. In addition, it will display the battery’s current output.
Around 8.40 volts and 1002 milliamperes should be the maximum output. An issue might exist if it’s not within a reasonable range of that value. Your battery or the charger might be the problem.
Please be aware that we are not charging the Fat Shark battery in a balanced manner throughout this procedure.
Make a list of things to remember while charging the Fatshark Batteries
There are a few things to keep in mind when it comes to charging LiPo batteries. Charge your phone while keeping these things in mind. Even if you’re using an Arrma Granite BLX battery, they’ll still come in useful.
Hack 1
Ensure the safety of your battery by keeping it in a fireproof container. This will let you to better recognize and respond to a lipo fire. Explosion-proof lipo bags or metal ammunition boxes are ideal solutions.
Hack 2
A fire extinguisher should be kept in the area where batteries are charged, discharged, and stored. The environment should also be free of combustible things.
Hack 3
Don’t let your battery voltage drop below 3.2 volts per cell if you want it to remain healthy. Ensure that each cell never goes below 3.0V.
Hack 4
Overcharging your battery can result in damage. An example of a lipo battery is the fat shark battery. Lithium-ion batteries may bulge up when overcharged. Your FPV’s performance will suffer as a result of this. Additionally, you may need to buy a new battery.
Hack 5
When your battery is charged, make sure you keep an eye on it. Lipo fires are uncommon but may spread quickly if they get out of control. You must be on hand in the event that the battery begins to malfunction or even catch fire.
Hack 6
Keep your battery charged for no more than 2-3 days at a time. Discharge to 3.6-3.8V/cell or utilize it.
Similar tips are applicable if you face DJ spark battery troubleshooting.
| Product 1 | |
| Product 2 |
If you fail to charge the Fatshark battery, it may be completely damaged Purchase a better one from the suggestions to avoid the hassle.
FAQs
What might be causing my DJI FPV battery to refuse to charge?
If the DJI Phantom battery won’t charge, the most likely cause is an inoperable charger. If your charger doesn’t work, get a new one. If your battery hasn’t been used in a while, you may want to pull it out of hibernation mode to fix charging issues.
How should I recharge the goggle V2 battery?
Please connect the AC power adapter to an AC power source in order to charge your DJI FPV’s intelligent flying battery. The intelligent flight batteries should be discharged to 30% or lower before charging, which takes around 50 minutes.
What is the best way to recharge my DJI Goggles?
Connect the USB cord to the goggles, and then use the USB power adapter that comes with the goggles to recharge them. The charging indicator will alternate between solid red, yellow, and green when charging. The progress is shown by the sequential illumination of the battery level indicators on the right side of the goggles.
Bottom Line
We hope you’ve got enough info about how to charge Fatshark battery.
There has been no cooling since the 18650 batteries are invented. So, during charging, the battery may get overheated. Avoid overcharging the battery by charging it at a slower pace.
Best of Luck!